13 More Things You Can do in Canvas to Make Your Life Easier

You loved our blog post on 13 Things You Can Do In Canvas To Make Your Life Easier, so we’ve rounded up 13 more things! Enjoy these additional Canvas tips and tricks and let us know if you have any others to share.
1. Add unlock date to pages
If you’re familiar with availability dates in Canvas, you know that you can use an “Available From” date to keep assignments locked in Canvas until a certain time. Now, you can do the same thing with Canvas pages in addition to assignments. When you’re editing or creating a page, simply add a date in the Publish At field to have the page become available to students on that date.
If you’re adding the page to a module, be sure that the module is published and unlocked so that students can access the page.
2. HTML in Canvas
Have you ever stumbled upon the HTML editor in the Canvas Rich Content Editor and wondered what it was? HTML stands for HyperText Markup Language and is used to make web pages. Using HTML in Canvas allows you to organize your content and customize the look of your course. Check out some of the HTML ideas we’ve collected and tested for accessibility!
3. Custom links in course navigation
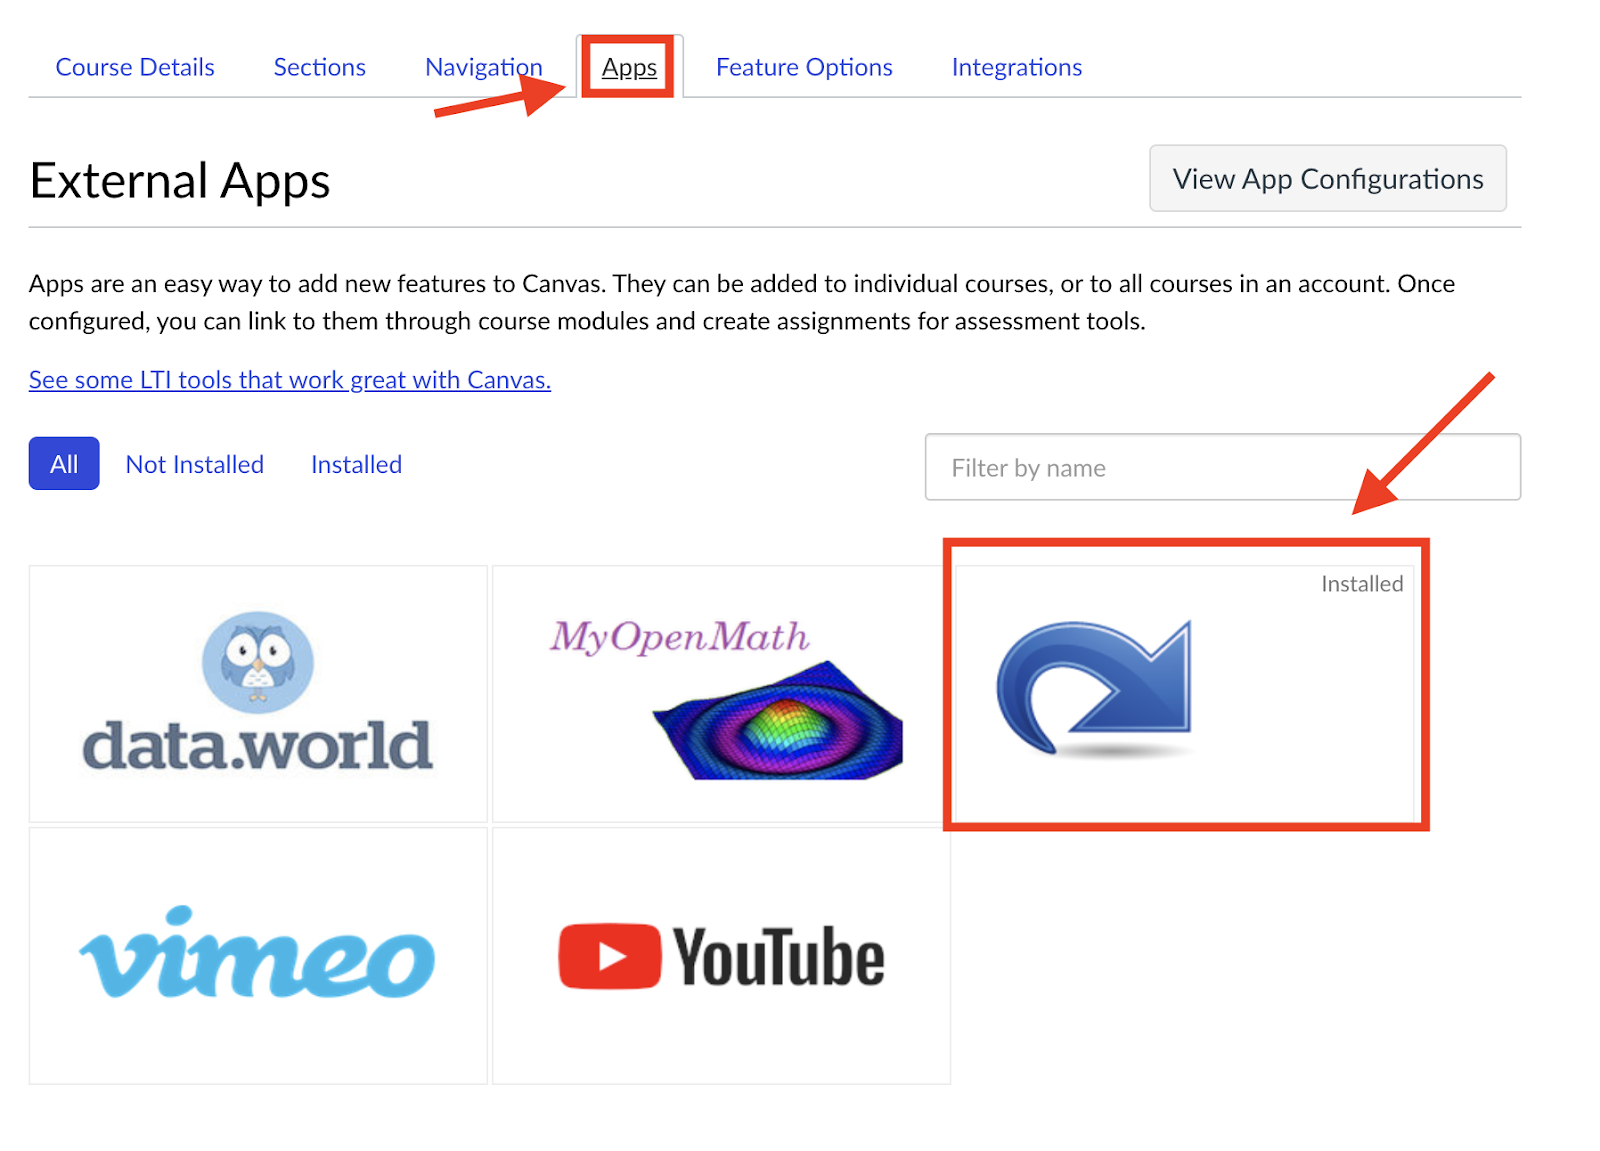
The Redirect Tool in Canvas lets you create custom links in your course navigation. This comes in handy when you want students to easily access a particular resource. To add a custom link, go to your course settings, then click the Apps tab. Under External Apps, click the big blue arrow/Redirect Tool:
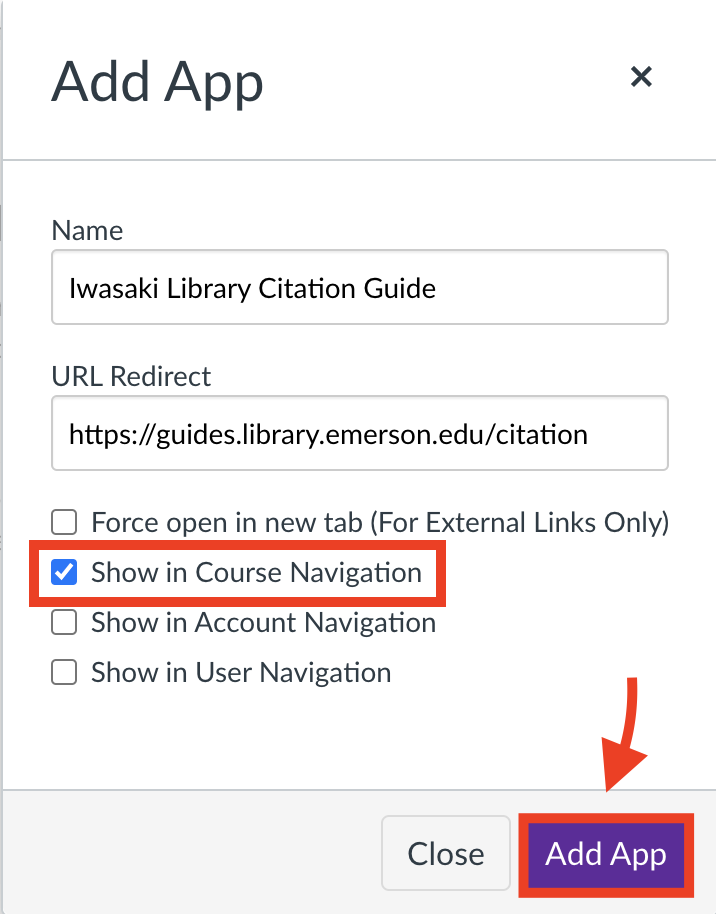
Copy the link you want to add as a custom link in your course navigation, then return to the Redirect Tool page and select +Add App. Paste the link under URL Redirect, then rename the link under Name (the text you enter here will appear in your course navigation). Be sure to select Show in Course Navigation:
Please note that custom links to Canvas course content are not automatically updated when importing from one course to another. Therefore, the imported custom link will need to be hidden, then recreated using the steps above in order for the link to work.
4. Use question groups in quizzes for exam randomization
If you choose to assess students using Canvas quizzes, this feature may be of interest to you. You can use question groups in a Canvas quiz to randomize quiz questions so that not all students will take the same exact exam. When you add a question group in the quiz editor, you’ll need to designate the group name, the number of questions to randomly pick for each student’s quiz, and the number of points per question. Then, add your questions to the group either by creating them from scratch or by pulling them from a question bank.
5. Use text header (no question) question types to categorize questions
Another helpful feature in Canvas quizzes is the text header question type. This question type allows you to have a block of text that doesn’t require an answer or any type of input from students. You might use a text header question type if you want to provide context to a following set of questions, or if you have different parts to an exam and want to provide a clear delineation of when one part ends and a new part begins. Below is a screenshot of what this question type looks like on a Canvas quiz:

6. Automatically regrade (certain types of) quiz questions
Have you ever made a typo in a Canvas quiz question or realized after the quiz was administered that the wrong answer is marked as correct? We’ve all been there! The good news is that you can automatically regrade three types of questions: Multiple Choice, True/False, and Multiple Answers.
If you need to regrade other question types, it would have to be done manually via the SpeedGrader.
7. Accessibility resources built into Canvas
In an effort to engage all students in classes, every course should be accessible. There are several tools built right into Canvas that check your content for accessibility, flag issues, and explain how you can fix them:
- Ally Accessibility Gauges
- Ally Course Accessibility Report
- Ally Rich Content Editor (RCE) Accessibility Checker
- Canvas RCE Accessibility Checker
8. Create a badge for excused absences in the Roll Call Attendance tool
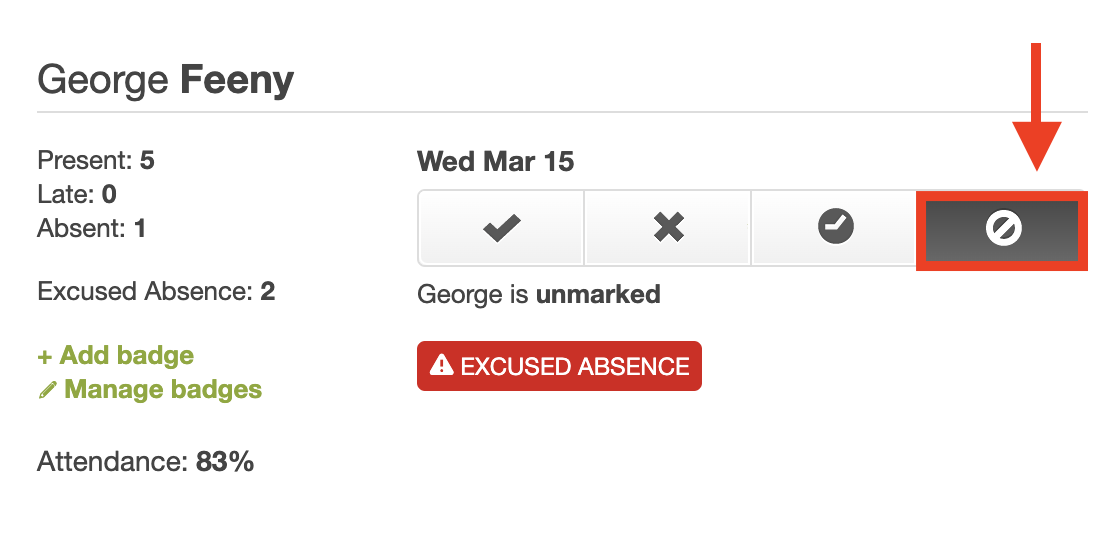
This semester, we’ve had more people than usual asking us about how to record excused absences in the Roll Call Attendance tool. The best way to do this is by creating a badge for excused absences; by using a badge to record excused absences, when you click More next to a student’s name within the attendance tool, you’ll be able to see the number of excused absences that a student already has. When you do use an excused absence badge be sure to also give the student the “unmarked” status so that they aren’t penalized for their absence:
9. Import content from Canvas Commons
Canvas Commons is a place where Canvas users can share content with other Canvas instructors at their institution or at other institutions. To access Canvas Commons, log into your account, then click Commons in the left navigation bar. From there, you can search for “Emerson College” to see resources that ITG has made available (e.g., Zoom Recording Consent Form assignment, Faculty Help Module, etc) as well as resources from your colleagues. Import things that you think could be useful for your course!
10. Add same Zoom meeting to multiple courses
Reminder: According to FERPA, if a student has opted out of disclosing directory information, the institution may not disclose the student’s attendance in a class to students outside that class. Therefore, before you follow the steps below to add the same Zoom meeting to multiple Canvas courses, you’ll need to be clear with the students at the start of class that you intend to use the same Zoom link for office hours in all of your classes. If that is a problem for any student, they should let you know and you can set up one-on-one meetings with them.
If you have office hours on Zoom and would like to have the same office hours meeting link available in your Canvas course’s Zoom tabs, this tip is for you! Click the Import Meeting button on each of your course’s Zoom tabs to add the same meeting link to all your courses.
11. Automatically drop lowest scores
Dropping the lowest one or two scores is a fairly common grading policy that can be easily automated in Canvas through an assignment group rule. You can choose the number of lowest scores to drop and indicate any exception assignments (assignments that should never be dropped).
12. Favorite courses to customize your dashboard
If you choose to display your Dashboard in the Card View, you can customize what course cards appear on your Dashboard by favoriting (or unfavoriting) courses from your All Courses list. This is helpful for removing past semesters’ courses or other courses you may not access very often.
13. View previous courses
More likely than not, you’ll need to go back to a course from a previous semester. Perhaps you’re looking for content that you want to pull into a different course, or maybe a past student of yours has asked for a letter of recommendation and you want a reminder of the good work the student did in your class. The good news is that ITG makes it easy for you to go back in time because we never delete old courses nor their enrollments or associated student data. To access a past course, simply log in to your Dashboard at canvas.emerson.edu, then click View All Courses at the top of the page.