Customizing your word.emerson site with CSS
When using a WordPress blog (either on word.emerson.edu or emerson.build) for a course, the theme you choose will provide certain options for customization. To make style changes beyond those options, you will need to dip into the site’s CSS. Note: If you choose to use CSS to customize your site beyond the options provided by your theme, you will be responsible for writing and troubleshooting your own code. ITG will respond to any requests for help that come in from members of the Emerson community, but our support of custom CSS is limited.
CSS (Cascading Stylesheets) code is what tells your browser how the content on the current page should look. It’s a powerful tool to have in your belt if you’re going to be publishing content on the web. To get started with CSS, I recommend taking some time to do one (or more) of the tutorials available on the web. Here are a couple of ones I’ve seen to get you started:
Making new styles for your site
Once you have some general CSS knowledge, it’s time to use that to customize your site!
If you’re planning to use CSS to change the colors of any elements on your site, you should ensure that the colors you’re choosing have enough contrast to help all viewers of your site read your content. Sites like Color Safe – accessible web color combinations and the WebAIM Color Contrast Checker can help with this.
(Note: The following part of the post assumes you’re using Google’s Chrome browser. If you’re using a different browser, take a look at the information on WordPress.com’s Support site for how to access the developer tools for your browser.)
Access your site’s homepage (for word.emerson blogs, that’ll be something like “word.emerson.edu/YOURSITE”). Right-click (or Ctrl + click if your mouse isn’t set up for right-clicking) on the part of the page you want to style. Choose “Inspect” from the menu that opens. This will open a new window showing the HTML structure of the page. The element you want should already be highlighted in the Inspect / Developer Tools window. If not, you’ll have to look through the elements to find it.
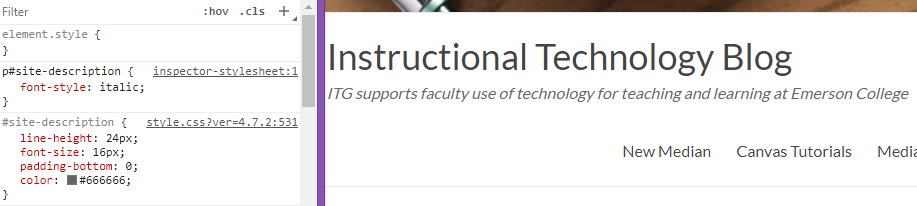
When you hover over an element in the Inspect window, the corresponding part of the website will be highlighted. This will also show you if the item has an id or a class associated with it. In the screenshot below, the subtitle of the ITG blog site is highlighted in the Inspect window (the right side of the screenshot) and on the blog page (left side). The HTML shows a paragraph with id “site-description” (the “p id=”site-description” part), which is listed as “p#site-description” on the left side of the screenshot. The “p#site-description” selector is what we would use to apply custom CSS to the blog’s subtitle.

(Tip: Try to be as specific as possible when using CSS selectors to avoid your style being applied to other, unintended elements.)
In Chrome, the Inspect / Developer Tools window allows you to try out styles without making actual changes to the site. Note: the Inspect/Developer Tools window does not save changes to the site. Leaving the page or refreshing it will wipe out all the changes you’ve made. You should always copy the styles you like to another program, like Notepad or Text/Edit. For this reason, I recommend only working on the styles for one element at a time.
The Dev Tools window has a sidebar with a tab for “Styles”. Click the “+”/”New Style Rule” button to create a style for the currently selected item. Click the newly created style to begin typing your CSS code. In this instance, I typed “font-style: italic;” in order to italicize the subtitle. You should see the change on the original window with your website. You can toggle your new rule on or off by clicking the checkbox to the left of it.
New style on:
New style off:

Again, these changes are not actually saved on your site yet. Make sure you have your new styles copied to another program before proceeding.
Saving custom styles to your site
While logged in, access your site’s homepage if you’re not already there. Click the “Customize” button in the black bar at the top of the page. Some themes and later versions of WordPress have an option to input Custom CSS built-in by default. You’ll see it listed as something like “CSS”, “Additional CSS”, etc.
If you don’t see an option under “Customize”, close the Customizer (by clicking the “X” above “You are customizing”) and visit your site’s Dashboard instead. Click “Plugins” and search for “CSS”. You should see a listing for “Simple Custom CSS”. Activate that plugin. Once that’s activated, you’ll see a new option under the “Appearance” menu in the Dashboard which is “Custom CSS”. Click that.
Whether you’re using Customize or the Simple Custom CSS plugin, you should see a box to enter in your CSS. Do so and save. The next time you visit your site, you should see the changes you made reflected there.
Further Reading
There’s a lot of other information about CSS and styling web pages and WordPress out there. Here are a few sites to do more reading on this subject:
- More on inspecting and editing styles with Chrome
- WordPress.com Support page on adding custom CSS (some steps may not be applicable to word.emerson blogs)
- WordPress.com Support: CSS Basics
- An Intro to CSS, or How to Make Things Look Like You Like
- An Intro to CSS: Finding CSS Selectors
- Intro to CSS: Previewing Changes with the Matched Rule Pane